Earlier this week, we gave you a brief introduction to rooting and its benefits. Now that you have had your Android device for some time, and have had an opportunity to get to know it, we’re going to move on to check out some of the most popularly used methods to root Android devices. It is important to bear in mind that the methods could vary from one device to another, and what works for one device, may not give success with another.
Also, there are various methods of rooting which involve using a command line interface, which might be a little overwhelming if this is the first time you are trying to root your device, so we’ll steer clear of those, and stick to the universal methods which have proven successful with most popular devices.
Universal Method
-
SuperOneClick Root
SuperOneClick is perhaps the most popular universal root method available today. Universal-because it works with more than one device. Rooting through SuperOneClick is as easy as launching the tool, and clicking the Root button- hence the name SuperOneClick.
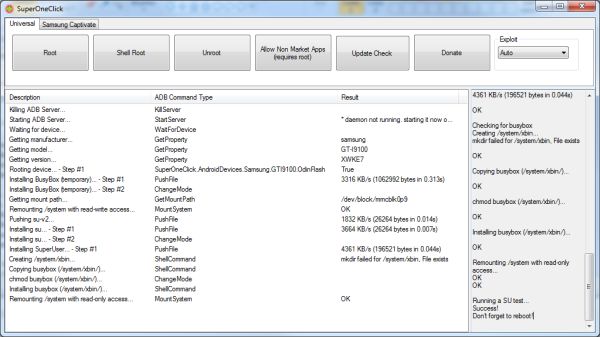
Here’s, how you can root your device using SuperOneClick. SuperOneClick supports a long list of Android devices, and all you need is Microsoft .NET framework 2.0+ if you’re using Windows, or Mono v1.2.6+ if you’re running Mac or Linux. Needless to say, you need to install the appropriate Android drivers for your phone on your PC, to make sure it is recognized by your PC when connected.
- Download SuperOneClick Root tool from here. Save it to your Desktop.
- Make sure USB debugging is enabled on your phone and connect it to your PC via USB cable
- On the phone, If prompted, do not mount the sdcard. Just select Charge Only mode.
- Now on your PC, launch the tool by double clicking the SuperOneClick.exe file
- Click on the universal tab (Check screenshot above). If you have a Samsung Capivate, select that tab.
- Click on the Root button, and let SuperOneClick do it’s thing. The process may take some time, depending upon your device.
- Once the process is complete, you should see a “Running a Su test Success!” message on the screen. You should also see a superuser icon in your app drawer.
- That’s it!! Easy as a click, and you should now be rooted!
You can visit the official website for compatibility details and development progress updates.
-
Device Specific Methods
Like I mentioned before, the rooting method may vary from one device to another. We are also going to list out some popular devices, and guides on how to root these specific devices that we have already published earlier. Just find your device in the list below, and click on the link to read a guide specific to your device. And keep watching this space for updates as new devices get added to the list..
-
Online Resources
There are some excellent resources online, in the form of community forums, which host device specific discussions and guides for Android devices. They are also a great source to download custom ROMs and add-ons. The most popular and informative ones are listed below:
So if you’ve owned an Android device for some time, but haven’t rooted it yet, go ahead and try one of the methods above, and liberate your device. Keep watching this space for more.
