Now that you have had an opportunity to go through our handy guide on How To Root the Galaxy Note, you are ready to enter the world of Custom ROM flashing, and discovering the plethora of stuff your device is now capable of, and which was far from achievable while you were running Stock OS.
One other thing, which the Note is capable of achieving, is the ability to run the next iteration of the Android OS – Ice Cream Sandwich. Sure, the AOSP source released by Google has been around for a while, but there’s nothing better than the real thing – which in this context means OEM leaked firmware, as it is optimized for use with the manufacturer’s hardware. And thanks to an unofficial, leaked Ice Cream Sandwich firmware for the Galaxy Note, it is now possible to upgrade the Note to the latest and the greatest- Ice Cream Sandwich.
Note
- Make sure all your personal data has been backed up
- Make sure your phone battery is fully charged
- This is the first ICS firmware leaked for the Note, and it is unofficial. Do not be surprised to find the odd bug or lag
- For all practical purposes, it is unofficial firmware, and would VOID your WARRANTY. If you take it to a Samsung service center, make sure you flash the phone back to un-rooted, stock firmware. Do not over-estimate the ignorance of the service center folks
- If you have Samsung’s KIES suite installed on your PC, uninstall it before you do anything. We are going to use another firmware flashing tool called ODIN. As it happens, KIES and ODIN do not get along very well with each other
Requirements
- Download the N7000XXLP1_N7000OXALP1_OXA firmware | Filesize: 539 MB
- Download and install Samsung USB drivers from here : Windows 32 bit | Windows 64 bit
Procedure
- Download the XXLP1 firmware file to your PC, and extract the ‘N7000XXLP1_N7000OXALP1_OXA.zip’ file to your desktop.
- The extracted folder should contain the following files:
- GT-N7000-MULTI-CSC-OXALP1.tar.md5
- MODEM_N7000XXLP1_REV_05_CL1098475.tar.md5
- N7000_CODE_N7000XXLP1_CL88317_REV02_user_mid_noship.tar.md5
- odin3 v1.87.zip
- Q1_20110919_32GB.pit
- samfirmware.com.png [Pls ignore this file. It is not required for the flash process]
- Extract the odin3 v1.87.zip file in the folder above to a different location on your desktop. You should end up with the following files
- Odin3v1.87.exe
- Odin3.ini
- Now power off your Galaxy Note, and reboot to Download mode. To boot into Download mode or Odin mode- press and hold the Volume Down + Power +Home buttons together. At the ‘Warning!‘ screen, press Volume up to activate Download mode
- On your PC desktop, navigate to the Odin3 v1.87 folder, and launch Odin by double-clicking the Odin3 v1.87.exe file
- Connect your Note ( currently in Download Mode) to the PC via USB cable
- You should see the text “Added!! appearing in the Odin message box to the bottom left of the main program window. You should also see the ID:COM port box at the extreme left turn Yellow. This means that Odin has detected your device
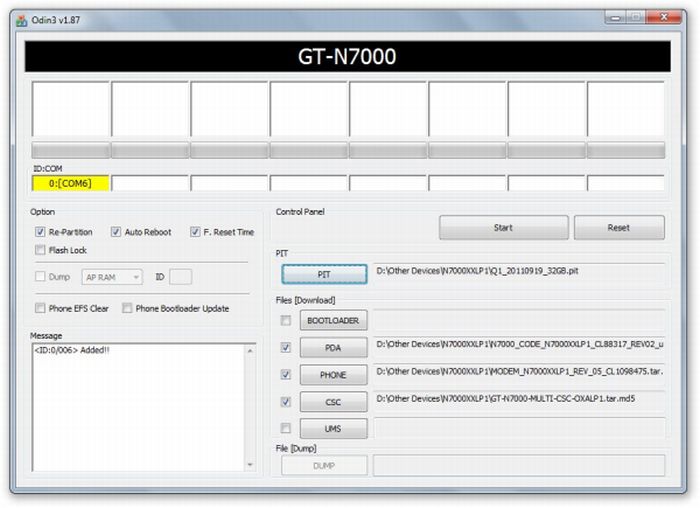
- Now make the following selections in Odin. Pay special attention to make sure that the selections are exactly as mentioned below. Now, in ODIN, select these files from the XXLP1 folder on your desktop, in the respective tabs:
- Click the PIT tab, and select the file Q1_20110919_32GB.pit
- Click the PDA tab, and select the file N7000_CODE_N7000XXLP1_CL88317_REV02_user_mid_noship.tar.md5
- Click MODEM tab, and select the file MODEM_N7000XXLP1_REV_05_CL1098475.tar.md5
- Click the CSC tab, and select the file GT-N7000-MULTI-CS
- Click the PIT tab, and select the file Q1_20110919_32GB.pit
- Important! On Odin, make sure Auto Reboot and F. Reset Time boxes are checked. Leave everything else as default.
- Once your selections are complete, verify your selections again by referring to the screenshot below. The only difference would be the path where the firmware folder lies on your PC
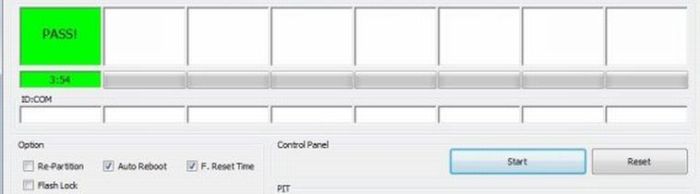
- Now click the Start button in Odin to start flashing the XXLP1 firmware onto your Note. As the firmware is getting flashed, you should see the progress bar above the com port box move. Once Odin has finished flashing the firmware to your device, the progress box should indicate the text PASS! with a green background. Check screen below.
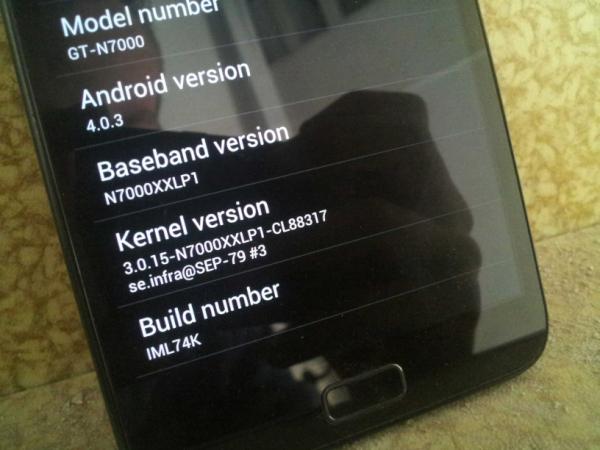
- When it has restarted, your Galaxy Note will be running the Android 4.0.3 Ice Cream Sandwich XXLP1 firmware. Check your firmware version in Settings » About phone
If you’ve been wondering what ICS would be like on the Note, go ahead and treat yourself with this guide. The entire process, shouldn’t take more than 15 minutes, on the outside. And now that there is a base firmware available, you should start seeing a variety of custom ROMs, being created by developers, and a variety of handy guides to flash those ROMs, written by us. Should you have any doubts or run into any issues while flashing your device, give us a shout, and we’ll do our best to help you out.
