 I love MixMeister and I love my nanoKontrol, both work fantastic. But one thing which I could not find anywhere on the internet was mappings that allow Korg nanoKontrol to operate with MixMeister Studio. So this post is dedicated to all of you who are yearning to work with these two technologies. Follow the below mentioned steps to download, install and go mixing music. (Yes it’s that easy!)
Before you proceed please confirm following:
- This method only works for Windows (Windows 7 and XP but No OS X or Linux)
- You already have Korg nanoKontrol device installed (That includes nanoKontrol Driver and Korg Kontrol Editor installed). I bet you have that, but if you don’t, visit Korg now, download and install these from the software section before you continue.
- You have Mixmeister Studio 7 or later installed.
Okay, so once you confirm the requirements, proceed with below mentioned steps:
STEP 1: Download the file nanoKontrol4mixMeister package (~614 KB only), and extract its contents to a folder.
STEP 2: Connect your Korg nanoKontrol device to your PC.
STEP 3: Open the folder in which you have just extracted the contents. Double click on ‘MixMeisterStudio.nktrl_set’. This will open up Korg Kontrol Editor.
STEP 4: In Korg Kontrol Editor click on ‘Communication’ and then click on ‘Write Scene Set’. You will then get a pop up window saying that ‘This operation will rewrite all data on nanoKontrol’ press on OK to write this data on your device.
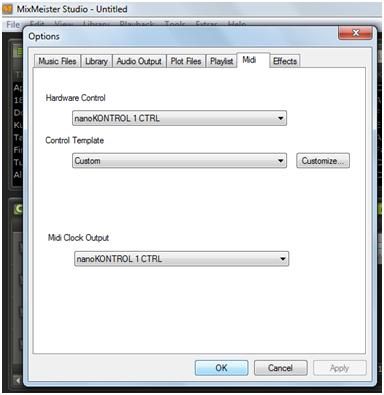
STEP 5: Now open MixMeister Studio, and in the menu click on Tools and then Options. This will open up the options window. In the options window select your device as shown in the image below and hit Ok to save the settings.
- Select nanoKONTROL 1 CTRL in Hardware Control field. (name may be different for you),
- Select Custom in Control template field, and
- Select nanoKONTROL 1 CTRL in the Midi Clock Output field.
STEP 6: Go to the extracted folder and double click on the ‘nanoKontrol4Mixmister.exe’ to install the mappings for MixMeister Studio.
STEP 7: Close all Windows and restart MixMeister, and finally use “nanokontrol 4 Mixmeister.png” to learn and use the mappings.
Please note that these are only the basic mappings which I have created in order to use my nanoKontrol with MixMeister Studio. Also try to follow these steps as they are mentioned in step by step fashion. Leave a comment if you want to help me in developing a more advance version of these mappings or expanding it for OS X operating system as well, or if you just want to thank me or tell me if these didn’t worked for you.


